How to Create, Track and Manage Employees? 👩⚖️👩🏭👨🏫
Employees are the ones who provide services in your company. You can have one to as many employees as you need, and you can easily set their unique schedules and track their business for the next seven days.
If you are the only one providing service - don't worry, your admin details are already used during the onboarding process to create the first employee. The only thing necessary to pay attention to is whether you have connected that employee to at least one service, but to all services you want your customer to be able to book.
If you didn't do that during the onboarding, continue reading to find out how it can be done.
| Creating your employees | Assigned services |
| Working hours | Employee list |
Creating your employees
To add an employee, start by clicking the icon in the sidebar to access the Employees page. Then, click the "+ Add Employee" button, and a modal will appear, allowing you to enter essential information about the employee, including their First Name, Last Name, Photo, Email, Phone, Location, and Service.

- First Name: Here, you should enter the employee's first name. Currently, this field is mandatory and cannot be left empty.
- Last Name: In this field, you need to enter the employee's last name. Similar to the first name, this is also a mandatory field.
- Employee Photo: In this section, you can upload a photo of the employee. This image helps differentiate employees on various pages, such as the calendar, employee list, and appointment pages. It also allows customers to see the employee when booking. Once you upload a photo, you'll have the option to crop it for the best fit within a circle. After setting the image, click "Crop," and the cropping popup will close, displaying the picture in the Info tab.
- Email: In this section, add the employee's email address. It's crucial to fill in this field accurately since it's also mandatory. Please note that two employees cannot share the same email address. If you attempt to use an email that's already in use, you'll receive a notification to change the address.
- Employee Phone: Here, you should input the employee's phone number. By default, the country code is set based on the General Settings under the "Default phone country code" option. However, if the employee is in a different country, you can adjust the country code here for that specific employee.
- Location: This field will only appear if you've created at least one location on the Locations page. While an employee can work at multiple locations (which can be set in the Assigned Services tab, explained later), it's necessary to select a default location in case no specific location is chosen during the employee's working hours. If no location is selected during working hours, the default location will be used.
- Service: In this section, you can specify the services that this employee provides. Please note that you can also add these services later using the edit employee option.
Now you can click on "Add Employee" and your Employee will be created.
Rest assured, there's more to discover about employees. We have a variety of additional options and features that can be accessed via the "Edit Employee" function.

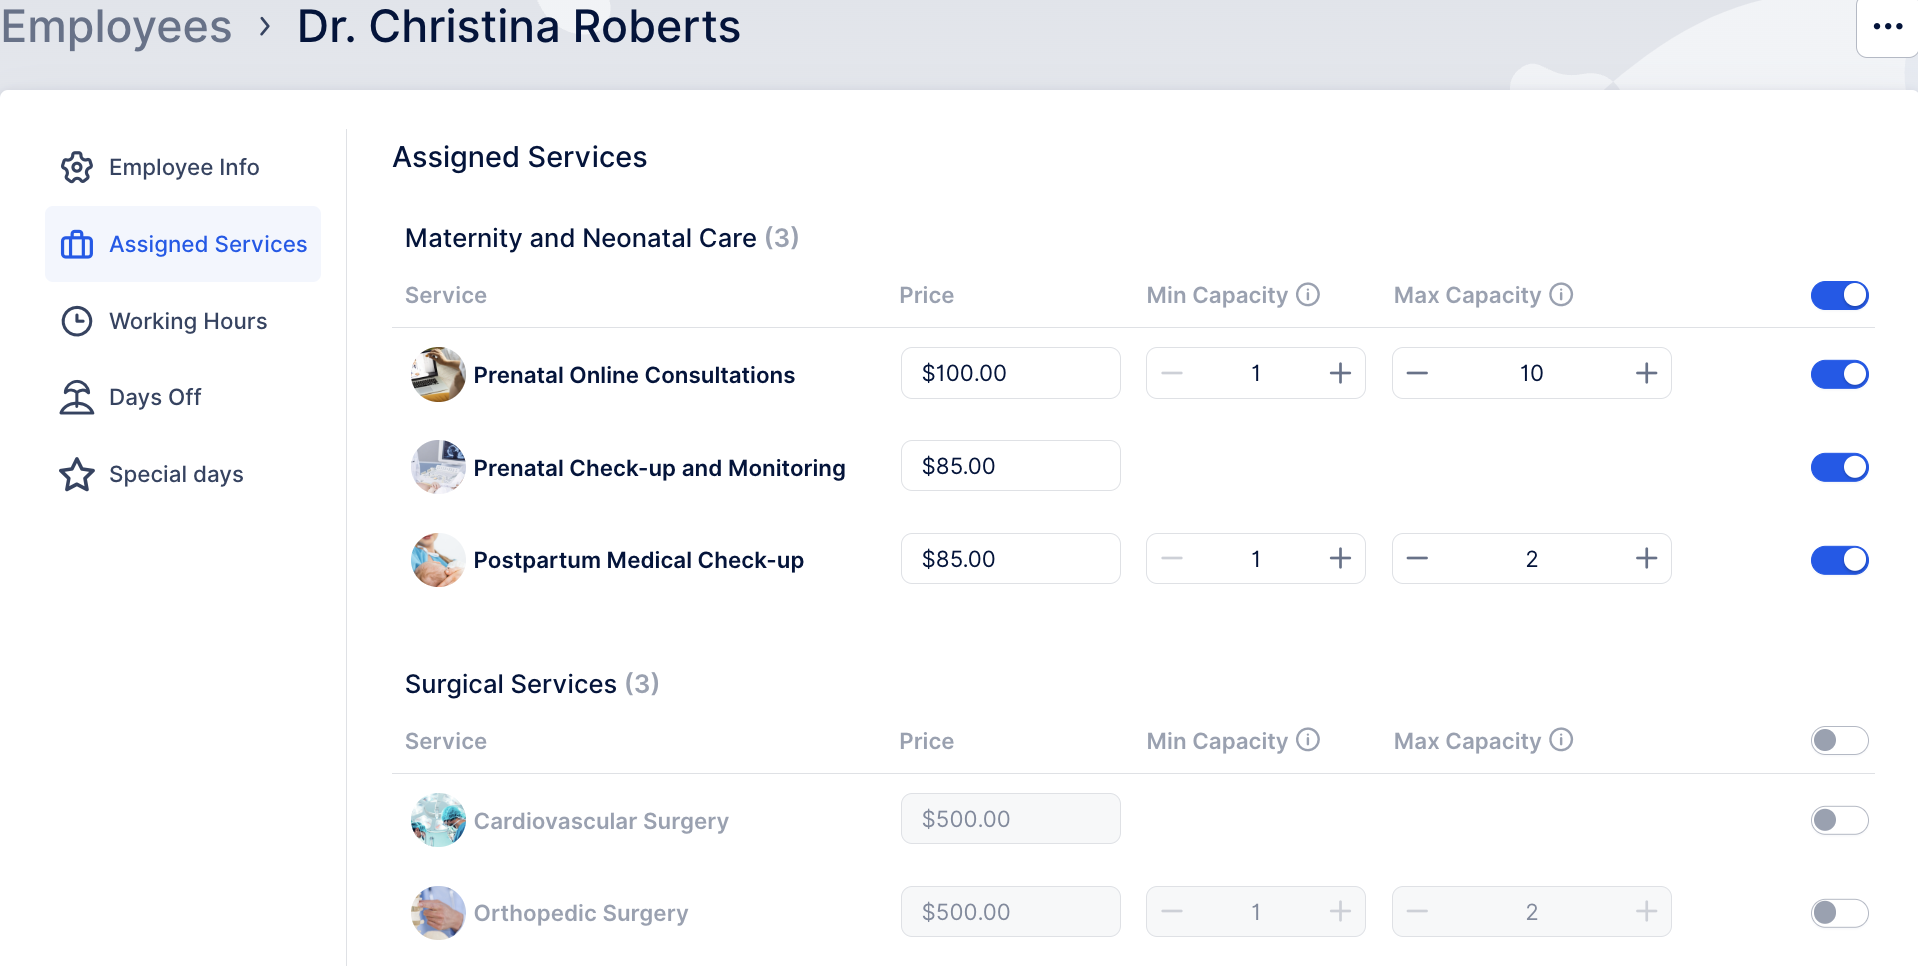
Assigned Services
In the Assigned Services tab, you can see all created Categories with Services and choose which services the employee will provide by enabling/disabling each of them. Besides this, once you enable/assign the service you will be able to set a different price for the service for that specific employee and also set different minimum and maximum capacities for the employee from the one set on the service side.
This will give you an option to differentiate employees by services that they provide, the prices that they offer, and the capacities that they have. If you later decide to change the default service price and capacity - this can be done too! If you have any employee with unique pricing or capacity you will be asked whether you want to change it for the service and new employees, or for all employees. The process is very easy if you have a large list of employees with unique values, and you want to change it with one click but we also made sure that you have the option to keep unique values.
On the Booking Website, the prices for services provided by employees may have a plus sign (+) or a minus sign (-) to indicate whether they are higher or lower than the standard rate. This helps your customers understand the pricing differences when selecting a service and employee.
Working Hours
In the Working Hours tab, you can set a unique schedule for each of your employees.
As a default setting, the working hours established during the onboarding process or subsequently in the Office Hours settings will be displayed here, along with all assigned services and the initially selected default location. For each time period, you have the flexibility to choose different services and one or multiple locations. Furthermore, you can create multiple time slots for each day, segmenting them with time intervals to include breaks.
It's important to note that if you add distinct working hours for a specific employee, this information will take precedence over the company's default working hours.
Please Note: If you have set the working hours but your dates and time slots are still invisible in your booking form please check two things:
1. Service and Location assigned to the working hours - open the employees working hours and check whether service/s and location/s are assigned to the working periods. You can check this on the Employees page as well, since the employees without assigned services will have the red note.
2. Service duration fits in the working periods - Service duration + Buffer time before and after needs to be shorter than the created working period, if this is not the case the service will not "fit" to the working period and all days will be shown as unavailable for booking.

Please note: You can also add breaks in your employee's schedule by configuring Days Off or add custom schedule for certain days or time periods by configuring Special Days.
Working with employee list and tracking their business
On the Employees page, you can see a list of all your employees with their basic information such as their photos, names, emails, phones and availability. Besides this, if you have a large number of employees on several pages here, you can search them by name or click on the Filters option and search by Services that they provide or Locations on which they work.
On the checkbox next to the employee's names you can select several employees and use the bulk " Delete" option at the top of the page but you can also delete each employee separately by selecting just him or choosing ... on the right side of the employee bar and then choosing the "Delete" option.
Please note: If the employee has some appointment in the future you will be notified about that and asked whether you want to make this action. If you click yes, both employee and his future appointments will be deleted.
On "..." you can also choose "Edit" employee and change employee's info, assigned services, or working hours.
As for tracking employees' performance, this can be done by simply clicking on one employee from the list. Once you click on the employee, the sidebar with additional info will open and show:
- Employee's picture,
- First and last name,
- Employee's business for the next 7 days including:
- Number of appointments,
- Cashed (earned money, counting only paid appointments)
- Percentage of load (counting number of booked hours compared to the total number of available hours set in working hours)
- Hours in appointment (number of booked hours)
- "..." with option to Edit or Delete selected employee

All the above can be seen in numbers in the first box and in the visual chart below. On the chart, you can see arrows so you can switch between the number of appointments, percentage of load, and hours in appointments.